Welcome back! So you’ve downloaded Microsoft Outlook, and booted it up and realized that you have no idea how to add your account to the program? Or maybe you have one account added but you’re looking to add your second e-mail account to the platform. In either event, I’ve got you covered! Follow these steps to add your new e-mail account to Microsoft Outlook on Mac OS!
- Obtain your email address information. This step can vary greatly depending on which email provider you’re using. If you’re using one of the more popular providers, all you will end up needing are your e-mail address, user name, and password. If you’re using one of the lesser-known providers, or are hosted on your own server, you may find you need to acquire more information. Your hosting provider should have the means to provide you with the information you will need. Once you have obtained this information, you are ready to move onto step two.
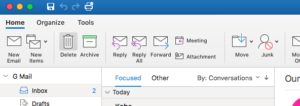
- Open Microsoft Outlook. Once it has loaded, you will be presented with the following.

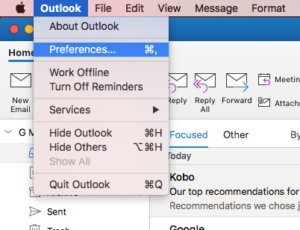
- Click Outlook > Preferences.

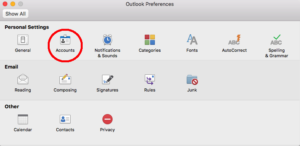
- Click Accounts.

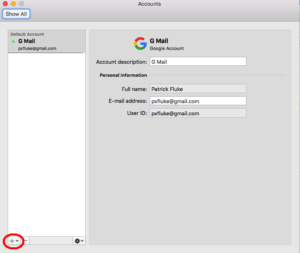
- Now click the “+” button on the bottom left-hand side of the screen.

- You will now be prompted to enter your email address. It is at this point that the next step will change depending on whether your provider is one of the supported providers which allow you to just log in, or you have to enter the details that we acquired in step one. In either case, once you have entered your email address, press the Continue button.

- You will now be presented with a “Set up your email” dialog. This dialog will have boxes for all the information we collect in step 1, however, it will have automatically filled in anything that it was able to determine on its own. In my case, The only piece of information I need to enter is my password.
- Once you have entered all the required information, press the Add Account button. You will have now added your email account to Microsoft Outlook on your Mac! Congratulations!
- If you wish to add another account, return to step 1, if you are done then you can now click Done. There is nothing further you need to do to get your email in Microsoft Outlook for macOS. That being said, I have a couple of bonus tips for you!
How can I change the description of my email address in Outlook?
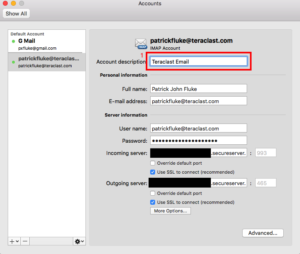
- You may notice that your newly added email address is displayed with your user id, most likely your email, listed above the inbox. If you’re fine with it, that’s okay, if you’re like me and you want to shorten that up, Follow steps 2 through 4 to get back to the Accounts settings.

- See where it says “Account Description?” this is likely your email address at the moment. Simply change that to whatever suits your fancy. When you’re finished, close this window.
- Your email will now be displayed in Microsoft Outlook with the new title you’ve given it. Congratulations!

How Can I Select Which E-Mail I am Sending From?
- This is actually fairly straightforward, but easy to miss if you’re anything like me. Don’t fret! Click the button to compose a new email.

- Once in your new message, notice there is a from the line just below the ribbons. Currently, on my message, it is sending from my default G Mail address.

- Click the From Address and you will be presented with a drop-down menu. Select the email you wish to send your message from.

- Finish composing your message, and then click send. Congratulations, you now know how to send a message from any of your currently set up mailboxes, and if it’s not set up, you also know how to add a mailbox to Microsoft Outlook on Mac OS!
Thanks for reading folks! Have a good one!